katoftw Posted April 18, 2015 Share Posted April 18, 2015 Yeah is it no different from destination board on model trains. Most of the boards are blacked out with only the orange light passing through. If attempting to do a JR station frontage sign or similar, again the green and white JR decal goes on front with clear plastic, and the rest of the box is painted black. Or at least paint it black on the inside if you want the outside of the sign to be a different colour. I would be interesting to see how small you could go. But if you look at the condom vending machines or the lantern toris, you can see they are quite small. Only has to be a fraction of a millimeter bigger than the LED itself. 1 Link to comment
cteno4 Posted April 19, 2015 Share Posted April 19, 2015 401 led is only 1x0.25x0.25mm! Jeff Link to comment
SantaFe1970 Posted April 19, 2015 Share Posted April 19, 2015 My machines are again hand made and not Kobaru, but the method of construction is quite similar. Clear epoxy is the secret ingredient. Care to share how you use this "secret ingredient"? Link to comment
kvp Posted April 19, 2015 Share Posted April 19, 2015 I have to assume we have to ask the manufacturer about this, but i assume the window is made by moulding the whole machine as a single clear piece of epoxy part. The contents go on the inside the rest on the outside and the clear frame acts a light router to illuminate the front. It's a good way since for small signs you can place the led into the wall or ceiling. 1 Link to comment
cteno4 Posted April 19, 2015 Share Posted April 19, 2015 (edited) The one I tried a couple of years back (one of those projects I unfortunately put aside) was to glue the SMD led into a piece of 5mm stryene channel stock. Then glued a piece of acetate with the machine front printed on the backside on top of this. Then trimmed the led current wayyy down. Worked pretty well, but needs some more playing with. I like the two layer effect these have and I think doing another frame sticker over the front to mask off the solid bits and drop back the resessed clear ares are more gives a great depth effect he has here! Would be grand to get a tutorial, but some like to keep their secret sauce! Btw ledbarron on ebay is a great source of wired SMD leds if you are not the micro soldering type! Very economical right now for those buying in dollars as well! They ship as many as you buy for the flat shipping charge and will wait a week if you try some auctions as well. http://stores.ebay.com/ledbaron?_rdc=1 Cheers Jeff Edited April 19, 2015 by cteno4 Link to comment
VJM Posted April 22, 2015 Author Share Posted April 22, 2015 (edited) Edited April 24, 2021 by VJM 5 Link to comment
zartan Posted May 13, 2015 Share Posted May 13, 2015 This is a really spectacular layout. Wow. Link to comment
VJM Posted May 21, 2015 Author Share Posted May 21, 2015 (edited) Edited April 24, 2021 by VJM 4 Link to comment
VJM Posted May 23, 2015 Author Share Posted May 23, 2015 (edited) Edited April 24, 2021 by VJM 4 Link to comment
Bernard Posted May 23, 2015 Share Posted May 23, 2015 Wonderful layout....I loved the way you built your roads and the lines on them (my weak point in modeling) 1 Link to comment
katoftw Posted May 23, 2015 Share Posted May 23, 2015 Were did you get the Tori gate from the last pic from? Link to comment
cteno4 Posted May 24, 2015 Share Posted May 24, 2015 (edited) Were did you get the Tori gate from the last pic from?Im still baffled that greenmax or tomytec or even kobaru have not done the dozen pack of simple torii gates in a few styles and colors! Seems like such a no brainier that every modeler doing a japanes layout would buy! Much more than many of the scenery kits that greenmax and tomytec do. I have to build a new one for my old tomytec shrine as I popped it off a long time back to use on two different scenes for jrm layouts and now have misplaced it! While not that challenging to make,must seems like one of the most staple scenery parts that could be made for Japanese layouts! There is enough plastic in them to probably be $3 each to 3d print compared to really cheap to just injection mould (and ultra simple moulds to boot!) I guess I just need to sit down and start to churn out a half dozen by hand and 80% of the way in tomytec will announce a set! Jeff Edited May 24, 2015 by cteno4 1 Link to comment
katoftw Posted May 24, 2015 Share Posted May 24, 2015 (edited) I'm baffled also. There is probably more Tori gates in Japan than platforms. Tomytec have some with shrine sets, and Greenmax have some with godown sets. But none to buy individually. Having a set of 1x large, 2x medium and 2x small would be good. Edited May 24, 2015 by katoftw Link to comment
cteno4 Posted May 24, 2015 Share Posted May 24, 2015 This is about the only set of Toriis you can get. But it requires you to buy the structures as well!! Pro hobby has a small one (oop I think) and also kobaru has the litttke one you can use with lighted lanterns but thats about it. Jeff Link to comment
VJM Posted May 24, 2015 Author Share Posted May 24, 2015 Yep, that's where my torii's come from... they are Greenmax kit 2162. I was actually going to use the torii's and ditch the buildings, but in the end I managed to use the buildings somewhere in the town. You can see the small lantern shaped jizou in the shadows from that kit in the picture above. The other stone lanterns we ended up drilling and putting LEDs in, and had them placed at the temple. Link to comment
malcoJOJO Posted May 29, 2015 Share Posted May 29, 2015 Fantastic work! Beautiful. This makes me wish I wasn't so quick to pull the trigger on my layout! hehehehe I just was so excited. Great work. Smooth design. Fab details. Link to comment
serotta1972 Posted August 30, 2015 Share Posted August 30, 2015 Beautiful layout! Im waiting for the video series on youtube. Link to comment
nscalestation Posted August 31, 2015 Share Posted August 31, 2015 Fantastic layout ! Those narrow streets and all the overhead wire structures really add to the realism. Link to comment
Kb4iuj Posted August 31, 2015 Share Posted August 31, 2015 Well done. Do you have plans to put a helix next to it and put on another layer for another scene ? Link to comment
VJM Posted October 21, 2015 Author Share Posted October 21, 2015 (edited) Had to make a minor modification to the control panel shelf. I had to lower it so that the power cables had more room as they were pressed right up against the layout, and the controllers themselves are no longer blocking the view of the front street. Edited April 24, 2021 by VJM 5 Link to comment
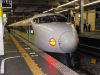
VJM Posted October 25, 2015 Author Share Posted October 25, 2015 (edited) Peach Rapit I really need to sort out my camera focus. Edited April 24, 2021 by VJM 17 Link to comment
VJM Posted December 17, 2015 Author Share Posted December 17, 2015 (edited) Microace make some really great looking models. A2235 EF13-25 + A6976 TOKI 21100 Steel coil train Edited April 24, 2021 by VJM 16 Link to comment
VJM Posted December 19, 2015 Author Share Posted December 19, 2015 (edited) Trying another angle Kato 2019-1 C62 18 with 10-534/535 SUHA44 TSUBAME (full consist) and 10-937 E3 TOREIYU TSUBASA crossing over the bridge in the background Edited April 24, 2021 by VJM 9 Link to comment
VJM Posted January 26, 2016 Author Share Posted January 26, 2016 (edited) Some more old photos Edited April 24, 2021 by VJM 11 Link to comment
kvp Posted January 26, 2016 Share Posted January 26, 2016 Great photos and a great layout! Btw. you seem to have a digital controller in the background in one of the shots (i think an esu ecos). I would really like to see a few pictures of the other layout that this controller belongs to. Thanks in advance! Link to comment
Recommended Posts
Create an account or sign in to comment
You need to be a member in order to leave a comment
Create an account
Sign up for a new account in our community. It's easy!
Register a new accountSign in
Already have an account? Sign in here.
Sign In Now