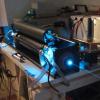
medusa Posted January 24, 2017 Share Posted January 24, 2017 Since I saw the E6 Shinkansen the first time, I was fascinated about the fact it was delivered to Akita via cape gauge main line tracks. Thought immediately how to model that.Fortunately the Kato E6 has the same shell on both cab cars, just the extendable coupler of car No. 11 is missing in car No. 17. Still better, Kato decided not to glue the nose cab over the unused space so it still can be removed (sharp fingernails definitely help here!). Alas, time for modding... :DIn my parts box I still have a pack of Kato 11-712 knuckle couplers (that's the Microtrain ones). Gave one of the "long" ones a try. Since it obviously is hopeless to get the wire used for magnetic decoupling inside a Shinkansen nose, I simply left it away.After playing some time to find out how deep I have to place the coupler box inside the E6's nose (the nose cap still has to fit over it, and everything is quite narrow in there), I marked the hole position with a needle and drilled a 1mm hole in the grey part which carries the coupler. Screws are included in 11-712, so I simply fixed the coupler from below.For marking the hole position I had used the two protruding plastic pieces as guidance (end about at the point where normally the iron wire is). After fixing of the coupler, I cut them off since they limit the horizontal movement of the knuckle.From the underside, the coupler box sits quite tight in the E6 shell. It might be impossible to plug in the nose cap properly so I cut off part of the coupler box bottom plastic, too. Careful about that - the tiny spring inside must not be exposed.After these tweaks I did a test if everything works so far. My EF65 had to be the test bench (a long story why, I bought it long time ago to haul the E6 which still was a dream at that time. Meanwhile I use it with the Orient Express only).BTT, the knuckle on the E6 is slightly high but not too high. Can't trim it deeper because the opening in the shell's nose doesn't allow for.With shell on again, it starts too look quite promising...And in the end I gave it a preliminary test on a piece of R315 curved track. This seems to be the limit. Of 4 configurations (both sides of the EF65, each left curve and right curve) I had one derailment of the E6 car. Other 3 went well. So, real-life test on a layout still has to come. 3 Link to comment
medusa Posted January 24, 2017 Author Share Posted January 24, 2017 (edited) And an update: gave it a run on some test loop containing two radii (R348 + R315) and branches. Result is good so far. No derailment on left turns, runs fine on inner and outer loop and over the branches. Right turns have most time no problem, just in one position entering the turn the car tended to tilt a bit (possibly the reason for the derailment in the first test yesterday?). Interestingly the branch S-turn was no problem at all, whether left nor right. Need to take a detailed look what is going on on the coupler head on entering right turns. Since a knuckle is not symmetric, the train behaviour isn't, too. Another detail still needing attention is the light switch. Car 11 has some decoder dummy which acts as a manual switch. Car 17 hasn't it but of course it has the space for the decoder. So I need to make some dummy of plastic sheet (or maybe some forum member has done DCC conversion of a Kato E6 and has the dummy left over?). EDIT: as you can see on the photos, I took out the motor car from the E6. The E6 runs faster than the EF65 so any test of the coupler would have been nonsense here... Edited January 24, 2017 by medusa 2 Link to comment
Martijn Meerts Posted January 27, 2017 Share Posted January 27, 2017 That's something you don't see modelled every day :D Link to comment
medusa Posted January 27, 2017 Author Share Posted January 27, 2017 (edited) Thx Martijn. :) As a final detail I made a copy of the dummy decoder. Took several layers of 0.5mm cardboard. The sides which are supposed to slide between the bronze springs need a sharp leading edge. To prepare the cardboard for some filing work, I soaked the critical parts by several drops of Revell plastic glue. Thus after drying it became stiff enough not to crumble under file treatment. See the result below, original and copy. After several rounds of fine tweaking, it fits perfect in both 11 and 17 cars and does its job. Edited January 27, 2017 by medusa Link to comment
Recommended Posts
Create an account or sign in to comment
You need to be a member in order to leave a comment
Create an account
Sign up for a new account in our community. It's easy!
Register a new accountSign in
Already have an account? Sign in here.
Sign In Now