Search the Community
Showing results for tags 'kato'.
-
Hello everyone! I was wondering if anyone would be so kind as to provide me with information, experience, or photos of shell compatibility between different years of the Kato ED75? I have a Kato 3009-5 with the original motor and was curious to know if I could place that model's shell on a newer model motor of a compatible ED75. Thank you! - Mauricio

-
Hello, I need some help with my C11 (Kato 2002). It is a very smooth running locomotive but I have problems with the leading axle as it often derails on my turnouts. I use Arnold turnouts which aren't the finest but I would still like to run the C11 until I switch to a better track system. I have already widened the leading axle and it got a little bit better but not much. Any help will be appreciated!
-
Hey all! So with some difficulty, I managed to get a small Tomix business tower. I have a bunch of card kits on the way which I'm looking forward to assembling. Sadly, the tower had absolutely no interior at all! So I decided to at least add some floors. They're held in place with some blu-tak for now until I go back and add lighting or a more full interior. What's everyone else done lately? Michael
- 53 replies
-
- 7
-

-

-
- structures
- tomix
- (and 1 more)
-
Hey guys, I'm slowly starting to build up track and other supplies for a small N-scale layout mostly using Kato-brand Unitrack. Currently, Kato has a very limited amount of their unitrack available with concrete ties, and I'm just wondering if anyone has ever tried to repaint the black wood tie track pieces to make them look like their concrete-tie counterparts? If so, could you tell me the color(s) used or recommendations for potential colors? ~Phillip
-
My custom solution for lighting KATO DCC trains
paolo posted a topic in DCC, Electrical & Automation
So, here's my take on how to light the interior of a model train. In particular, I'll talk about N-scale KATO trains (I haven't tried this on Tomix) in a DCC system. Since I have DCC, if I wanted to use the KATO lighting kits, I'd need to put a decoder for each car. I have around 80 cars, so the cost would be very high. Besides the KATO light decoders (FR11) are very hard to find, even in Japan. So I decided to just forget about decoders, and have the lights always on. Passenger trains usually have the interior lights always on anyways, and I don't have a yard where they should be off. Without a decoder, I couldn't use the KATO light kits, as the LED's would burn out after a few minutes. DCC system outputs around 18V, but those LED's are usually designed for max 14V, according to their manual (I wouldn't push them higher than 12V though). So I've designed a custom board, with the LED's and a few elements needed to make this work. I have no experience of soldering, so I looked for someone who could do it for me. A friend told me about JLCPCB.com, a Chinese PCB prototype company, that can manufacture a small batch of PCB's. They have a very user-friendly design tool, needed to produce the files that are necessary to get the PCB into production. Each board has: 4/6/8 LED's, depending on the type of car. Shinkansen have eight, some Shinkansen cab cars have six or four (for the Komachi). Other trains have six or eight. The LED's are arranged in two groups in parallel, with each group having the LED's arranged in serial a diode bridge, that converts the AC coming from the tracks to the DC that the LED's need (BR1) a low-dropout regulator, that lowers the voltage from what is coming form the tracks (around 18V) to 12V needed by the LED's (U1) a capacitor, to temporarily store some electric energy in order to avoid the LED flickering effect (C1) a resistor for each group of LED's (so in my case, two total, R1 and R2) This is the electrical drawing of the version with 8 LED's: Here's the list of all the components, with the link to the LCSC Electronics website, used by JLCPCB: - cold white LED, package 0402, link - 40V 1A 550mV @ 1A MBF Bridge Rectifier, link Fixed 35V 12V 2V @ 1A TO-252-2(DPAK) Dropout Regulator(LDO), link - 22uF ±10% 25V 1.2 Ω @ 100kHz -55℃ ~ +125℃ CASE-C_6032 Tantalum Capacitor, link - 402Ω ±1% 0.25W 1206 Chip Resistor - Surface Mount, link This is the PCB view taken from the online editor (easyEDA😞 Each PCB costs around 1.9 euro, in detail: EUR 0.3 for the PCB prototype EUR 1.6 for the components and the assembly Then of course you need to add the shipping. I got them in three separate orders, each time I refined the design. The last order was for a total of 50 pieces, EUR 80 for the components and 30 for the shipping. The minimum size for a PCB if you ask for the components assembly is 2 cm, but that's too wide to fit it inside a car. So once I received them, I had to cut them one by one so they could fit. I cut them to around 1.3 cm using a Dremel. The lengths vary from 13 cm to 6 cm. The next problem was how to connect the PCB's to the copper pick up of the car. The KATO lighting kits come with a set of copper strips that fits in each car, these: After a lengthy search, I was able to find them on Rakuten Japan,sold in a package of 20 strips at 480 yen: This is the link to the Rakuten page. If you need to look for them, this is the title of the item: オリジナル K集電金具 集電板(集電シュー) カトー(kato)にも使えます 20個セット Using a short piece of wire, I soldered these strips to the PCB (I bent them downward so they make a better contact with the wheels): On JLCPCB, they only have cold white LED's, while most of the trains have more like warm white lights. So I had to find a way to make them yellowish. I tried putting a drop of orange paint on each LED, but the result wasn't consistent, you had some really orange ones and some white ones. After watching a video on Luke Towan's YouTube channel, I decided to use his method and apply some Tamiya tape, usually used for masking before painting, on each LED: To fit the PCB inside the cars, most of the time you need to trim the plastic supports, that I think are designed to hold the transparent acrylic strip used in the KATO lighting kits. Without trimming those, you won't be able to close them properly. This is the final result (sorry but getting the right color temperature it's a bit hard, in the pics they all look much more blue than they actually are): I used them on Shinkansen (N700A, E2, E3, E5, E6, E7), E233, E235, E657, E353. They all fit perfectly. I'd prefer them to be a bit warmer, but they're good enough. I think that's it 😄 Paolo
-
Hi Guys, I’m taking the plunge with Kato. I’m going to buy a few individual packs of track to get me rolling. Does anyone know the part numbers for R249 45 degree curves, the 248mm straights, feeder track (62mm I think) and 62mm straight all with concrete ties. Also what connector does the feeder track have? thank you
-
So I am hoping to install DCC sound into a Kato N scale D51 steam locomotive (product number 2016-8). I have the locomotive, but I have yet to purchase a decoder or speaker. I wanted to know if anyone else has done this or a similar project and if they have any recommendations for which decoder or speaker to use and if they have any tips for doing the conversion. Thanks in advance!
-
I have recently fitted some Kato lighting to my Green Max 3 car emu 30257/8/9, which runs quite smoothly and quietly. It was a fiddly job but the non motorised cars were the easiest and were fitted within two or three attempts. However, the powered centre car needed a lot of trial and error, and in the process the body has stretched sideways resulting in the chassis becoming loose under the body. Any advice please? Is this a common pitfall when handling such delicate models and I stress I was really gentle when trying to align the lighting coils in order to function properly. I have a new Farish British Railways class 31and it is very noisy compared to the GreenMax unit. Are the Japanese motors superior to the English ones? Could anybody give me the technical description of the motors used in each brand. Could I also ask if a "Brawa super quality" N Gauge brand exists, please, and the motors they fit to their models? I just cannot tolerate the poor quality junk that British companies churn out for the captive market here.
-

Making a 14 Guage Wire that Can Plug into the DCS50K
Gilshrat posted a topic in DCC, Electrical & Automation
So I am using a DCS50K (Kato Part No. 29-119) DCC system to run my Japanese train layout. I currently am using the standard wire connectors and splitters that come with Kato track (Item No. 24-825 & 24-827). However, I am having issues with power drop and poor DCC single pick up by some of my locomotives. These wires use 22 gauge wire which is considered thin for a standard DCC power bus. I am thinking of making my own power bus using 14 gauge wire. However I need to make a custom plug so I can connect the power bus to my DCS50K. Does anyone know if you can purchase uncrimped versions of the plugs used by Kato so I can make my own power cables? If you can, what are the called and who makes them? Part number? Thank you in advance for your suggestions and help.
-
Hi all, After finding some 6mm MDF in the garage, I've decided to give T-Trak a go. I've got 3/4 of the way through putting two "standard" 308mm x 300mm modules together. The photos show the results: Poorly assembled, constructed etc, but hey it's a learning curve!
-
Hi everyone! So I'm currently living in Shenzhen, China for 2 years while I teach music at an international school. During our first October holiday, we got to visit Tokyo, Japan, where I fell in love with the vast and efficient system of trains and the general politeness of the people we met. I've been lucky enough to live in several countries in my life, but Japan strikes me as a shining example of what other places could achieve if they fully committed to public rail transport. So, I got some trains from the wonderful Kato store, as well as a pair of second hand Shinkansen (100 and 300) from Popondetta Akihabara, and enough track for a simple double loop with stations. After a couple of weekend trips to Hong Kong, I built up enough track for a much larger double loop with some buildings and sidings. Then I began building a viaduct system to run the Shinkansen. I based my system on the central Tokyo station, and the next commuter stop on the Yamanote line, Shimbashi. That's my simple 4 track commuter station across the street from a row of large skyscrapers (still collecting those) and behind that, the Shinkansen viaducts. That's the main diorama of the layout, and everything else is mostly for operation. I enjoy a mix of scenery and passenger operation, especially with a variety of different types of trains with different roles, Commuter, Limited Express, and long distance Shinkansen. Here's a basic rundown of my layout plan, and eventual additions. The layout is basically complete at this point, and what I'm going to add are staging tracks and a connecting ramp between the upper and lower lines which will make the operation more fun. I began by thinking about the kind of operation I most enjoyed, with commuter trains making regular stops and shuffling back and forth, and ducking away to let faster express trains by. Once I had that idea down, I started designing the scene I wanted. I particularly liked the spot in Tokyo, the Maranouchi skyline seen from the imperial gardens where the trains are running in between the skyscrapers. The main diorama is loosely based on that. Tokyo station at the moment is represented by a single-level 4-track terminus, and a lovely old Faller station kit built by my father in the late 1980s! I thought it a decent stand-in for the gorgeous red-brick Maranouchi station building. My apartment has a spare bedroom which we mostly don't use - so it was perfect as a spot for a return loop. The Shinkansen line is essentially a single track loop folded into a dumbell shape with a return loop at each end. I've tried to keep the 'driving on the left' system as far as possible - so familiar to me from designing OO British layouts for so long. Since I'm focusing on Tokyo amd Shimbashi, I'm focusing on the JR West Shinkansen, which have always been my favorite - the 100, 300, 500, and 700 series. I finally got an E7 though. The blue and gold is so pretty, and since the line to Kanazawa will eventually link up with Osaka, I consider it an honorary West Shinkansen, even though it leaves Tokyo via Omiya. The way I run this layout at present, trains leave Tokyo station and cross to the inner track. Eventually they terminate and cross back to the outer track in the other direction, and terminate back at Tokyo. More details and structures to come! I had a frustrating period of trying to do a city pavement base for my Maranouchi scene with thick card - which bent up and wouldn't lie flat, even with metal rulers glued to it. In the end I gave up and went with thin card which sits flat much better. I'll keep updating it as I can! I have an order of track and structures on the way which will spruce up the Tokyo Station a little. Also coming are the two wonderful Odakyu Romancecars - 7000 and 10000 series, both in wine red color. Favorites of mine from Microsoft Train Simulator back in the day! All best! Keep 'em rolling, train fans! Michael
- 5 replies
-
- 10
-
-
- unitrack
- temporary layout
- (and 4 more)
-
Hello everyone! I‘ve recently bought a full Tomix Twilight Express 92240/41/42 set on YAJ and since all my other rolling stock is from Kato and equipped with their 11-702 knuckle couplers I got a question regarding the Twilight Express‘ end car. It appears that this car is equipped with a dummy coupler and thus cannot easily be equipped with different couplers. Does anyone know if this is correct and if there is a cheap/easy fix for this issue as my model train club has a head-station possible to be used in their layout and it‘d be pretty odd to have "Hand of God" turn the whole train around because of a dummy coupler on one end of it. I already sorted out converting the loco to Kato couplers but would also like to know if the gap between cars gets too small once they‘re equipped with knuckle couplers as it seems to me that they‘re already reasonably close to each other. Thank you in advance for reading and I hope somebody could help me. Kind Regards from Germany, Jan
-

Has anyone installed a sound decoder into their Kato Shinkansen?
GeorgeHInch posted a topic in DCC, Electrical & Automation
I'm curious if anyone has added DCC sound decoder to their Kato Shinkansen, specifically the E7 or N700A. I saw a thread on here from back in 2015 that started addressing this but it seemed to end very anticlimactically due to limitations at the time. It seems like the non-motored trailer cars for the N700A have a cavern under the floor piece with a metal weight. Since the metal strips already run through here it seems like an easy place to stash a sound decoder with a sugar cube speaker. I assume a decoder and speaker will come close to weight to the metal already there. I think the biggest question here though, has anyone ever generated sound files for any of the Shinkansen? -
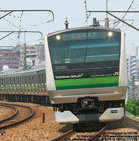
Just to share with you how I converted the Kato 103 series Yamanote line train to DCC. I am not claiming that this is the best, the only or even a good way of doing it but it worked! The Kato 103 series is not at all DCC friendly so it took a lot of disassembly, soldering and re-assembly, and of course adjustment of CV values. Maybe not something for the faint-hearted. For the motor car, I used a Kuehn N45, simply because it is small, can handle the motor current and it was readily available at the shop I bought it. To make sure that I got the wiring right, I marked the forward direction and left and right side of the car. The carriage needed complete disassambly and the copper strips connected to the motor needed to be bended upwards to allow soldering of the wires. Same for the left and right hand rail power busbars. I do not solder on these strips while assembled in the carriage to prevent damaging (melting) the plastic parts. Initially I had the carriage lighting simply run on rail power, as recommended by Ken Shores of the famous http://www.sumidacrossing.org. That worked fine on my N700A Shinkansen but the 103 series has large windows and the whole thing looked way to bright. However this decoder has no wire leads for interior lights. Instead I connected the white lead, normally used for the front lights, to the Kato interior LED assembly. That could easily be done because this carriage sits in the middle of the train and does not have front nor rear lights. I needed to reconfigure the front light controls to become interior lights (function mapping to F1) and adjust the dimming to a mere 30% of the full brightness. During testrun I found that the train runs way too fast. Some 350 scale-km/h easily! Real slow running was difficult. So I lowered the default start value to the very minimum and halved the max power value. Obviously this is decoder dependent. Because the decoder is quite small (and flat) it does not appear visible behind the windows. The front and rear carriages are wired up with Doehler & Haass FH05B decoders to control the head and tail lights. The Kato 103 series still has old school light bulbs for front and rear lights, assembled with diodes on a small printed circuit board. To wire the decoder to the lightbulbs, the diodes needed to be removed. To dim and control the interior lights the KATO LED assembly is wired to the Aux 1 connection of the decoder and function mapped to F1 key. Again the interior light LEDs are dimmed to 30%. Now the other carriages still had their interior light run on rail power. So these needed to get their own decoders. In this case I soldered the decoder red and black leads to the clips that power the interior lights. To do that two small holes needed to be drilled in the bulkhead in front of the LED assembly. At the right, the holes in the bulkhead are just visible (where the red and black wires run through). All decoders in the train have the same DCC address, just to make it easy to control everything at the same time. So all lights go on and off at the same time. Not sure if that is prototypical. Maybe in reality someone is walking through the train and switches on/off the lights of the carriages one by one. In that case I could reconfigure everything to turn the lights on and off in a staggered way through iTrain. The complete train (with one carriage missing because otherwise the train would be too long for my testtrack) Another thing is that with lights on, the train is obviously empty, without passengers. Maybe I should now add standing and sitting passengers, e.g. by having a PS sheet fitted with figures glued to it. Of course the figures will need to be cut at their waist to get their heads at the right level behind the windows...
-
Dear experts, I have a KATO lay-out with two KATO signals, the ones that show green and after the train passed show red and after a few seconds yellow and green again. No further logic. https://res.cloudinary.com/houprk4km/image/upload/c_scale,f_auto,q_auto,w_auto/v1526054665/zwlyn3woxs6a48bidjwb.jpg I have two of these but they won't work on DCC. I am have started to convert my layout to DCC. I will be using Digikeijs controller and I/O (whatever that is called in the DCC world), controlled by iTrain software. Conversion to DCC rendered my Kato signals useless. I will also be needing a few more to improve realism. I am now looking for prototypical correct JR signals that can be connected to the DCC system. They will be hooked up and controlled by iTrain . Is anybody aware of source for N-scale JR signals with working LEDs? I am aware of Greenmax models but these are dummies. I know I could possibly fit them with SMD LEDs but it would be a rather fiddly job I was hoping to avoid. Not sure if it would be easy to convert the KATO signals and wire them up to DCC. I find the Kato model also a bit plasticky and not very refined. I noticed that JR signals are a bit like the Dutch signals, but different nevertheless. I haven't given up on real JR signals yet! Your idea's are welcome!.
-
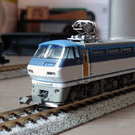
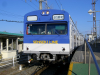
Hopefully somebody already solved this riddle and can help me! I started to convert my lay-out to DCC control and doing tests with and playing around with DCC control using my N700A. Now I am at the stage to plan ahead and check how to convert my other rolling stock. I have small electric locomotive, the KATO ED75-700 (Kato 3075-3) that is not DCC friendly. In another topic I found that a similar model (the Kato 3075-1) may be fitted with the Digitrax DC163K0A. Does anybody know if this decoder may also be fitted in my 3075-3 ? Many thanks! Jan
-
Hi all, I acquired a Kato TGV Sud-Est(10-198). It's missing the Pantographs. My manual shows the pantograph part # S14701F. Does anyone know if there is a replacement part # or where to find a comparable part. Thanks
-
Hello everyone Today I bought KATO 10-504-1 electric freight train (pocket line) with EB211 locomotive. I have question, EB211 is real locomotive or not? I cant find nothing
-
Hello - Its been a while for me on this forum but, as you know, life gets in the way. Anyway, I recently received this 6 car set thinking i would enjoy the fact that i could drop-in the Cab and Motor DCC decoders and off we go. The motor car install did not go as planned and it was at that point i discovered Sumida Crossing describing the exact same issue - DCC Kato Ginza - which is the EM-13 does not sit properly once slid into position (that lump of metal and the nibs between the motor and the truck slot prevents a flat seating.. You can also see from the pictures that, even after trimming the EM-13 width to clear the sides, I can not get the truck back on. So it looks like i will have to wire in a decoder - possibly a small LokPilot. Anyone have any advice for wiring a motor decoder in the Ginza Series 01? Also it looks like the motor is protected by a plastic piece that i will have to remove to get to the motor contacts. Im hoping that it just pops off if anyone can verify if they've done that before. Thanks and happy motoring, Peter
-
Hello everyone, I'm on the hunt for some software not too terribly expensive (hopefully) that lets you plan out an N scale track plan. I only plan to use sectional Kato Unitrack, so an archive of Kato track parts is a must. Do you have recommendations or programs that you would avoid? (By the way, I am using a PC) ~Phil
-
Well, I am nearly finished rebuilding my layout. Say Hola to Ciudad de Gloria, a modern metropolis boasting a subway system with a new railcar fleet and a snazzy and clean commuter railroad. The city is named for my late Mom. The Mayor and the City Council stress safety and passenger comfort over speed and profit. In fact, the railroad's motto is: "We get there when we do." Passenger traffic is booming and a new fledgling container port and soon to be added new auto transload center guarantee precious revenue and tax dollars for the future. I hope to add a couple of more subway set in the future, pending continuation of old people checks. And I'm even gonna try to cover up the city end of the layout with a plateau filled with grass and suburban homes, this way hiding the end tracks. It will also create more space since I'm not quite yet completed putting down all of the buildings I have. I've actually added the tallest structure on my layout, a Con Cor pre-owned hospital. But I still wish I had a proper car garage. LOL
-
I am seeking a bit of direction from the real experts amongst you! My lay-out is approaching completion with the scenery almost done and the trains running analogue. Few things still need to be completed but it is time to start wondering and thinking about the next steps: Equip my trains with DCC and operate them through a PC. There is an overwhelming amount of information available in the web, even on the forum. I have no idea where to start. The webpages of product manufacturers are overwhelming and confusing at the least. They advertise bits and pieces with datasheets without any easily comprehensible information on how to put it all together. E.g. Digikeijs and DigiTrax websites are hard to interpret. E.g. what module do you need to control the Kato turnouts? I do not have a huge lay-out. Currently there are 3 electrically separate loops with only 5-6 trains on it at any moment and only 3 driving at the same time. The photo's give an impression. I have a few dreams/wishes: I like/need to avoid complete re-wiring and partitioning of the tracks. JR style signals are controlled by the DCC system. Trains run a sort of time table automatically (by the PC) and nicely accelerate and decelerate prototypically. There is sound from the station with the JR tunes, whistles, brakes, announcements. Specific questions I have: I understand that it is nowadays possible to 'tune' the PC program such that the speedsetting of the train matches the actual speed. The software corrects for the normal differences between trains. Given that the PC sets and 'knows' the speed of the train, it continuously predicts where the train is with reasonable accuracy. This allows the PC to have a train stop at the platform without the need for train detection at every point you may decide to have your train stopped in future. Avoids a lot of wiring. Of course there is a need for a few detection points to reset the position calculations. a) Is my understanding correct? b) What PC software does that? What popular /affordable module(s) can be used to control the KATO 2-wire turnouts? They all seem made for 3-wire 2-coil turn-outs. Where can I find Japanese style signals that can be controlled by the DCC system? What about sound, either built into the KATO trains, or by having small speaker fitted under the station to have the PC generate the appropriate sounds (whistle, doors, announcements, the famous JR tunes, etc.) ? Are PC programs available that allow that to be added? Any help or directions y'all can give?
-
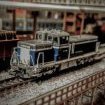
Hi all. Does anybody know a paint match colour fo the Hokutosei DD51s and coaches ? I'm tweaking a H0 Kato DD51at the moment but I also need to know about the four air hoses at either end. On the railway I work for in the U.K one end hose each side has yellow ends and cocks (100 p.s.i main res) and one red each side (train pipe pressure). If it is the same which ones are the upper outer hoses? cheers Kev
-
Hi everyone! Wondering if anyone had experience in adding a decoder to the Kato EF65 1000 311? Thanks in advance! - Mauricio
-
Does anyone know of a good website with a list of Kato Japanese locomotives and their corresponding "drop-in" decoders. All the lists I can find are only for their NA models, but I know that many of the light boards used in NA models are also used in the Japanese models and therefore there are compatible decoders out there for many Japanese models as well. Thanks